
Overview
You can make Pear Deck Slides within PowerPoint Online or Google Slides. But instead of simply presenting informational slides, Pear Deck makes your slides interactive so every student can respond to your questions or prompts right on their own screens.
.png?width=55&name=Peary_Normal%20(Forward).png) Pear Deck Slides help you engage every student in every seat and give formative assessments, no matter what grade or subject you teach. Pear Deck supports an interactive and community-focused classroom that helps students build confidence and comprehension.
Pear Deck Slides help you engage every student in every seat and give formative assessments, no matter what grade or subject you teach. Pear Deck supports an interactive and community-focused classroom that helps students build confidence and comprehension.
The Video
The Basic Steps
Step One
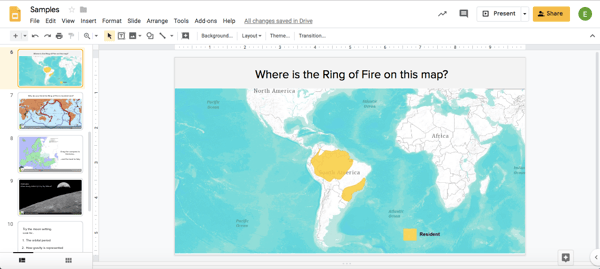
Open any presentation, new or old, in either Google Slides or PowerPoint Online. Add the prompts, questions, images, etc. you want students to see, using the editing tools in either program to fully customize the slides. Here's an example from Google Slides:
You can also add a complete, pre-made Slide Template from the Slide Library (see Step Three).
Step Two
- Create your Pear Deck account with a Google or Microsoft Office 365 email address.
- Get Pear Deck:
- If you create your account with a Google email address, you can get the Pear Deck for Google Slides Add-on.
- If you create your account with a Microsoft Office 365 email address, you can get the Pear Deck for PowerPoint Online Add-in. Please note that Pear Deck is only available in the online version of PowerPoint at this time!
Step Three
Open the Pear Deck Add-on or Add-in sidebar.
- In Google Slides, go to Add-ons > Pear Deck for Google Slides Add-on
- In PowerPoint Online, click on the Home tab, then click on the More Options (3-dots) button and select Pear Deck to open the sidebar.
You can add pre-made Slide Templates and/or make custom Interactive Slides. Scroll through the Pear Deck Sidebar to find these options. Learn how to add Slide Templates.

Step Four
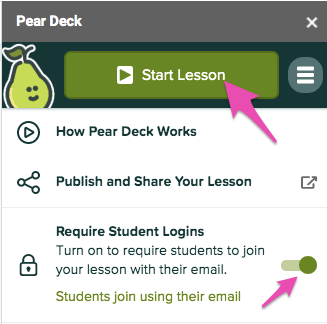
- Decide whether you want students to join your Sessions with an email address, or anonymously. You can require email login here in your sidebar (three-lines) menu and on your Settings page before you present. We recommend turning on email login - it's the only way to see the names of the students during or after the Session!
- When you're ready, click the green Start Lesson/Present button in the Pear Deck sidebar:
- Choose Instructor or Student-Paced Mode.

- Instructor-Paced Mode is synchronous. When you choose this mode, the Projector View opens. You can lead students through the slides on your Projector View, and their Student View syncs up. This is ideal when you're all meeting in real time on a virtual call or in a classroom where you can display the Projector View and all of the responses you collect, which are anonymous on this View by default.
- Student-Paced Mode is asynchronous. When students join the session they will have slide arrows at the bottom of their screen, so they can navigate through the slides and leave responses to any interactive questions in the presentation without the teacher needing to be present.
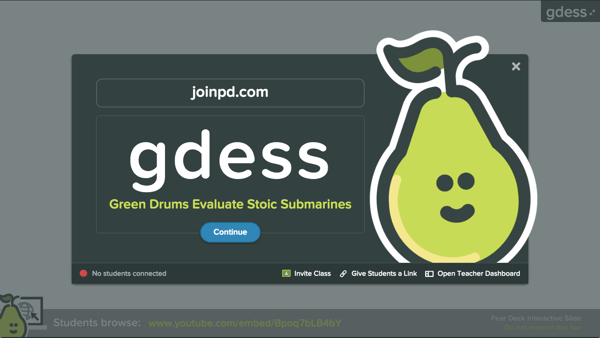
- This starts a live Session with Join Instructions for your students. Students must join the Session to participate. Click Give Students a Link to copy the Session Join Link, or give them the five-letter Join Code ("gdess" in the example below) to enter at joinpd.com. Students can use either the link or the Join Code to log in. Students do not need to create a separate Pear Deck account to participate in Pear Deck Sessions!
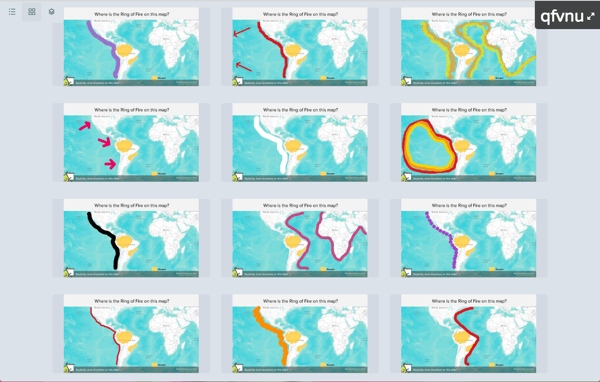
- After they sign into your Session, every student participates on their own device! Here's an example of the anonymous responses displayed on the Projector View:
- To see students' names and evaluate responses, open the Teacher Dashboard (available with Premium) during or after the Session!
Step Five
Review responses later. At the end of a Session, you may Publish Takeaways™ (individualized Google Docs) or export students' answers to a Google Sheet. Both options are available only when you use Pear Deck for Google Slides at this time. All users can review responses by reopening a Session in the Projector of Dashboard View from the Sessions menu.
For more information, check out the extensive guide to getting started with Pear Deck. For questions, email help@peardeck.com!
Article by Erin M.