
Overview
.png?width=55&name=Peary_Normal%20(Forward).png) By sharing the Projector View with your class, and using the Dashboard to review responses and communicate with your students, you can improve engagement, student achievement, and your school climate and culture. See the Learning Science behind Pear Deck!
By sharing the Projector View with your class, and using the Dashboard to review responses and communicate with your students, you can improve engagement, student achievement, and your school climate and culture. See the Learning Science behind Pear Deck!
- What is the Projector View?
- What is the Dashboard View?
Please note that the Dashboard is a Premium feature - How to use the Projector and Dashboard at the same time:
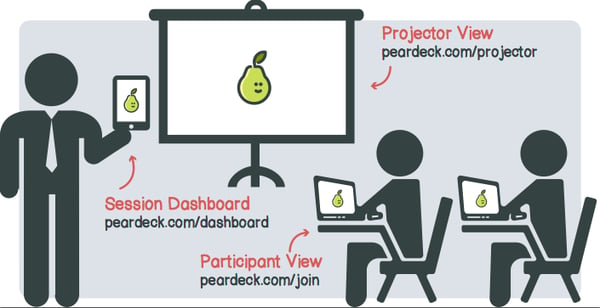
What is the Projector View?
The Projector View, along with the Dashboard, is one of the two presenter views in Pear Deck. The Projector View shows students' responses in real time, and the responses are anonymous by default here. Hover over the bottom of any slide and the Navigation bar opens. You can control the pace of the slides, Show Responses, Lock responses, open the Dashboard, and more. You open the Projector View automatically when you start an Instructor-Paced Session, but you can also open an existing presentation from your Sessions menu.
Example
Here's a Drawing Slide on the Projector View, before showing responses:
Here is the same slide after clicking the Show Responses button. Students' responses are displayed anonymously. In this example, the Response Layout was changed to Grid View in the top left corner of the screen:
-1.png?width=688&name=Drawing%2c%20map%2c%20grid%20on%20projector%20(2)-1.png)
What is the Dashboard View?
The Dashboard is the second of the two presenter views. In this view, you see the Projector Preview and Slide Navigator. You also see students' responses in real time along with their names, so you can get individual insight into their progress during or after your lesson. It syncs up to the Projector and Student Views, so you can control an Instructor-Paced Session with the Navigation controls here as well. Additionally, you can use the start to highlight individual responses on the Projector, hide responses from the Projector with the More Actions (3-dots) button, send private feedback to students, and more. Learn how to open the Dashboard.
Example
In this example, the Response Layout was changed to List View in the top left corner of the screen and now the teacher can scroll down to see more responses:

Use both views during a Remote Lesson
The best practice for presenting a remote, Instructor-Paced lesson to is to share the Projector View on your video call so that students can see it. Then, open your Dashboard View in a separate, private window so only you can see it.
- Start/present your Lesson.
- When prompted, choose Instructor-Paced.
- This opens the Projector View.
- Use the Projector View to control the slides, show anonymous responses, and more.
- Start a conference call, like Zoom, Google Meet, Teams, etc. These are just examples. Any platform that allows you to share your screen will do.
- Click Share screen or Present (depending on video call software you're using).
- When prompted, select the window with the Projector View of your Pear Deck Session.
- Email students with the link to your conference call so they can join you. They will see the window you're sharing and hear you speak.
- Give students the Join Code or Join Link so they can enter the Session and open the Student View on their devices. They will follow your Projector View on the call, and respond to the Interactive Questions on the Student View.
- Open the Dashboard from the Join Instructions screen on your Projector View, by going to peardeck.com/dash, or from your Sessions menu.
- The Dashboard syncs up to the Projector and Student Views. When you move to the next slide on the Dashboard, the other Views move too.
- Use the Projector View or Dashboard View to scroll through the presentation and show responses. The Student View will sync up to the slide you're on.
Use both views in the Classroom
In a classroom, the best practice for presenting Pear Deck is to hook your computer up to a Projector, just like when you present a normal PowerPoint or Google Slides presentation. The slides show up on the Projector View, so it is meant to be displayed on the Projector in front of class. You can then open the Teacher Dashboard (a Premium feature) on a separate device like your own computer or tablet so students don't see it!
How you set it up is a matter of what devices you have available and how you have them arranged:
- I have my computer connected to a projector - that's all
- I have a computer connected to a projector AND a separate tablet
- I have a Chromecast
I have my computer connected to a projector - that's all
Great. The key here is mirroring. You want to make sure you have display mirroring turned off.
What the heck do you mean?
Normally when you hook a computer to a projector, the projector displays exactly what's on your computer screen. That is, it mirrors your screen.
BUT!
You can make the projector display a different window than the one you are looking at on your computer. Just turn off mirroring.
Okay, how do I turn off mirroring?
- On a Chromebook
- Find Manage Displays and extend your desktop. There are also keyboard shortcuts to speed this up. This Google help article will guide you.
- On a Mac
- Open System Preferences and then click on Displays. Under the Arrangement tab, there is a little check box that says Mirror Displays. Un-check that box.
- On a PC
- Go to Display Settings and choose Extended Desktop. Windows support can help guide you.
Now What?
Once you have mirroring turned off, your desktop just expands across both the projector and your computer. That means you can drag a window from one screen to the other. So you can follow these steps:
- Start presenting your Pear Deck and choose Instructor-Paced Mode. The Projector View with the Join Instructions opens immediately.
- Drag the Projector View that just opened to your projector screen/monitor.
- Open another browser window on your personal computer or tablet.
- Go to peardeck.com/dash. The Teacher Dashboard of your most recent Session opens!
I have a computer connected to a projector AND a separate tablet
Perfect! This will be easy:
- Start presenting your Pear Deck and choose Instructor-Paced on the computer that is connected to the projector. The Projector View with the Join Instructions opens immediately.
- Next, open a browser window on your tablet and make sure you are logged into the same account you used to present the Session in step 1.
- Go to peardeck.com/dash.
- The Teacher Dashboard of your most recently launched Session opens. You can control the slides from anywhere in the room.
I have a Chromecast
What?! Really?! This will be total cake then!
- Start presenting your Pear Deck and choose Instructor-Paced Mode on the computer that is connected to your projector screen. The Projector View with the Join Instructions opens.
- Chromecast the Projector View to your big screen for all students to see.
- Open a new window and type peardeck.com/dash to open the Dashboard of your latest Session, where you can see individual student responses and control the Projector View privately from your own screen.
For questions, email help@peardeck.com!
Article contributors: Michal E.L., Erin M.